Using HPC Clusters with Slurm
This guide will help you harness the power of high-performance computing (HPC) clusters by using the Slurm batch system. Batch systems are essential for managing compute resources and executions on an HPC system. In this guide, we will cover the basics of job scripts, submitting and managing jobs, and useful commands with the Slurm Workload Manager.
Being a Good Cluster Citizen
To ensure optimal performance for everyone using the cluster, please follow these guidelines:
- Avoid running heavy computation on login nodes, as this can negatively impact everyone's ability to interact with the cluster.
- Make resource requests for your jobs that accurately reflect their usage. Wasteful job allocations slow down everyone's work on the clusters.
- If you plan to run many similar jobs, use job arrays.
If you need help scheduling a job, please contact support for assistance.
Batch Systems Overview
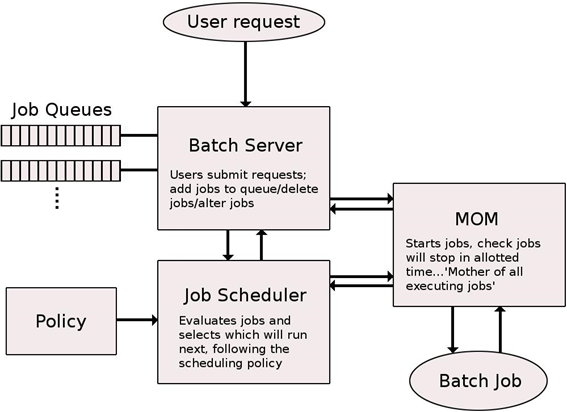
HPC systems rely on batch systems to manage compute resources and the execution of jobs. Users must write job scripts containing all the necessary information to run a job and submit them to the batch system. The batch system then allocates the requested resources to the job, depending on system load and compute node availability. HPC systems are inherently non-interactive, meaning that executions will not take place immediately after being requested, and users will not see intermediate results in real time.
Basic Slurm Commands
Here are some essential commands for working with the batch system Slurm:
sinfo: View information about Slurm nodes and partitions.squeue: List jobs running on the system.salloc: Obtain a Slurm job allocation, execute a command, and release the allocation when the command is finished.srun -p <partition> --pty bash: Run an interactive job.sbatch <script path>: Submit a job script for execution.srun -p <partition name> -n <number of tasks> -c <cpus per task> <my executable>: Submit a job for execution.sstat -j <job id>: Check job status.scancel <job id>: Cancel a job.scancel -u <username>: Cancel all jobs from the user.sacct -j <jobId>: Display detailed information about a specific job.sacct -S <date and/or time>: List all jobs that started after a certain date/time.
For additional options and information about these commands, you can use the --help parameter, manpage man <command>, or refer to the documentation at https://slurm.schedmd.com.
Submitting and Managing Jobs with Slurm
Jobs are organized and scheduled using Slurm, a job scheduler and workload manager. When submitting a job, you must specify a resource request and run one or more commands or applications. Jobs wait in a queue and are subject to several factors affecting scheduling priority. Once your scheduled job begins, the specified commands or applications are executed on the allocated compute nodes. If submitted as a batch job (sbatch command), the output usually printed to the screen will be saved to a file (by default slurm-<jobid>.out).
Common Slurm Commands
Here are some common Slurm commands:
-
Submit a script called
my_job.shas a job: -
List your queued and running jobs:
Equivalent to
--user=<my username>. -
Cancel a queued job or kill a running job (e.g., a job with ID 12345):
-
Check the status of a job (e.g., a job with ID 12345):
For more information on tracking resource usage, see the Monitoring CPU and Memory Usage documentation.
Requesting Compute Resources
When submitting a job, you can modify the size, length, and behavior of the job using various options. These options can be specified when calling salloc or sbatch, or saved to a batch script. Defaults are used for any unspecified options. Some common job request options include:
| Option | Abbreviation | Default value | Description |
|---|---|---|---|
--job-name | -J | Name of script | Custom job name. |
--output | -o | slurm-%j.out | Where to save stdout and stderr from the job. |
--partition | -p | Varies by cluster | Partition to run on. |
--account | -A | Must be specified based on the project you are working on. | |
--time | -t | Varies by partition | Time limit for the job in D-HH:MM:SS format. |
--nodes | -N | 1 | Total number of nodes. |
--ntasks | -n | 1 | Number of tasks (MPI workers). |
--ntasks-per-node | Scheduler decides | Number of tasks per node. | |
--cpus-per-task | -c | 1 | Number of CPUs for each task. |
--mem | Maximum value | Memory requested per node in MiB. |
Interactive Jobs
Interactive jobs are useful for testing and troubleshooting code. To request an interactive job, use the salloc command. This will allocate resources and log you into a shell on a compute node. For example, to request an interactive job for 2 hours, use the following command:
This command will assign one node to you for two hours. You can run commands in this shell as needed. To exit, type exit or press Ctrl+D.
Batch Jobs
You can submit a script as a batch job, which allows it to run non-interactively in batches. Submission scripts typically consist of three parts:
- A hashbang line specifying the program that runs the script (usually
#!/bin/bash). - Directives that list job request options, which must appear before any other commands or definitions.
- The commands or applications you want to execute during your job.
For examples of submission scripts, see the Submission Script Examples page. Here is an example submission script that prints job information and exits:
#!/bin/bash
#SBATCH --job-name=example_job
#SBATCH --account=my_group_project
#SBATCH --partition=processing
#SBATCH --output=slurm-%j.out
#SBATCH --time=1:00:00
#SBATCH --nodes=1
#SBATCH --ntasks=1

echo "Job ID: ${SLURM_JOB_ID}"
echo "Node: $(hostname)"
echo "Date: $(date)"
Save this file as example_job.sh, then submit it with:
When the job finishes, the output will be stored in a file named slurm-<jobid>.out, where jobid is the submitted job's ID.
If you find yourself writing loops to submit jobs, consider using job arrays instead.